Growing ginger is really easy, and can be done either in a container, kept indoors or out, or directly in your garden bed. Most growers tend to favor containers, as it's easier to control the soil and moisture that way; plus, you can easily move it if it needs more or less light or heat.
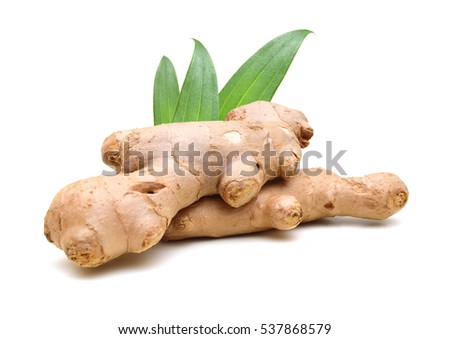
All you need to get started is a fresh and healthy-looking leftover piece. Ideally, look for a firm, plump piece with smooth skin and visible eyes — tiny yellow tips on the rhizome that will eventually develop into new sprouts. Here are some tips to propagate ginger. While you could potentially grow it at any time of the year, it tends to grow best if planted sometime between spring and fall; April through May tends to be ideal if growing them outdoors.

1. If using a store-bought piece to propagate your ginger, or if the piece you're using seems a bit dry, soak it in warm water overnight. If pressed for time, three hours of immersion will typically suffice. When replanting a really fresh piece, such as a freshly harvested rhizome that still has the plant stem on it, you can forgo this step.
2. Plant it in a well-draining pot filled with quality potting soil mixed with plenty of organic compost. California Gardening suggests using a ratio of 90 percent compost and 10 percent potting mix. The Spruce suggests adding worm castings. If using a 5-1-1 potting mix, be sure to add a complete vegetable fertilizer. For instructions on how to make a 5-1-1 mix, see the following video. Alternatively, you can plant them directly into your garden bed, provided you've made the appropriate soil amendments.
If you have a larger piece of ginger, go ahead and cut it into smaller bits. As shown in the featured video, simply press the ginger pieces into the soil, making sure the eyes face toward the surface, then cover with a light layer of soil (just enough to cover the eye without burying it).
3. Water well, cover the pot with a clear plastic bag to raise the humidity level and place it in a spot with partial sunlight. Mist regularly to maintain moisture. Should the root dry out, its growth will be permanently stunted. On the other hand, you'll want to avoid overwatering, as soggy soil will encourage rotting. So, keep soil moist but never soaking wet. A drip-irrigation system can be helpful.
The Spruce also offers the following trick to raise the humidity level: "Place your pot on a tray of small stones. Keep the tray full of water. This way it is always evaporating and adding moisture right directly to the plant's area." If your soil is overly wet and you need to improve drainage, add some perlite or vermiculite into the mix.
4. Once green tips start to sprout — which may take up to a month, depending on the temperature — remove the bag and keep it in a warm room with plenty of natural light. An ideal temperature is right around 75 degrees F. You can expect to begin harvesting the rhizome in six to eight months.
Harvesting Guidelines
If you planted your ginger in the spring, it'll be ready for harvest in the fall. While you can certainly dig around the rhizome to check its size, the easiest way to assess whether it's ready for harvest is to look at the size of the plant stems. The root is ready for harvest when the stems have reached a height of at least 3 to 4 feet. The taller the plant, the larger the root.
You have two options when it comes to harvesting. You can either dig out the entire root, or simply snip off a piece for immediate use, leaving the rest. If you want mild-flavored "stem" ginger for a culinary twist, harvest only what you need each time as the root will become "hotter" as the outer skin begins to dry out.
Remember to save some pieces to repropagate your ginger plants. Either select a plump, firm piece and cut in to smaller pieces, as you did before, or simply replant smaller rhizome pieces still attached to the plant stems. This way, you'll be able to maintain a continuous supply of ginger year-round. In winter months, you could simply bring the pot indoors.
Storage Tips
Fresh ginger will keep for at least three weeks in the refrigerator. To maximize shelf-life, place a whole, unpeeled piece in a resalable plastic bag; squeeze the air out and place it in the crisper drawer. If the piece has been cut or peeled, blot the moisture off with a paper towel before storing.
If left out on the counter, it'll dry out within days. Once the ginger starts to wrinkle, it will have lost much of its flavor and medicinal potency. Grated ginger can also be frozen for about six months, saving you a bit of time and cleanup when cooking. To freeze ginger:
Peel and grate the ginger
Place scoops of ginger (in whatever measurement is most convenient for you, say teaspoon or tablespoon sized dollops) on a parchment-lined tray’
Place the tray in the freezer until the dollops are frozen solid, then transfer the dollops to an airtight container.
Facts Credit: mercola.com
All you need to get started is a fresh and healthy-looking leftover piece. Ideally, look for a firm, plump piece with smooth skin and visible eyes — tiny yellow tips on the rhizome that will eventually develop into new sprouts. Here are some tips to propagate ginger. While you could potentially grow it at any time of the year, it tends to grow best if planted sometime between spring and fall; April through May tends to be ideal if growing them outdoors.

1. If using a store-bought piece to propagate your ginger, or if the piece you're using seems a bit dry, soak it in warm water overnight. If pressed for time, three hours of immersion will typically suffice. When replanting a really fresh piece, such as a freshly harvested rhizome that still has the plant stem on it, you can forgo this step.
2. Plant it in a well-draining pot filled with quality potting soil mixed with plenty of organic compost. California Gardening suggests using a ratio of 90 percent compost and 10 percent potting mix. The Spruce suggests adding worm castings. If using a 5-1-1 potting mix, be sure to add a complete vegetable fertilizer. For instructions on how to make a 5-1-1 mix, see the following video. Alternatively, you can plant them directly into your garden bed, provided you've made the appropriate soil amendments.
If you have a larger piece of ginger, go ahead and cut it into smaller bits. As shown in the featured video, simply press the ginger pieces into the soil, making sure the eyes face toward the surface, then cover with a light layer of soil (just enough to cover the eye without burying it).
3. Water well, cover the pot with a clear plastic bag to raise the humidity level and place it in a spot with partial sunlight. Mist regularly to maintain moisture. Should the root dry out, its growth will be permanently stunted. On the other hand, you'll want to avoid overwatering, as soggy soil will encourage rotting. So, keep soil moist but never soaking wet. A drip-irrigation system can be helpful.
The Spruce also offers the following trick to raise the humidity level: "Place your pot on a tray of small stones. Keep the tray full of water. This way it is always evaporating and adding moisture right directly to the plant's area." If your soil is overly wet and you need to improve drainage, add some perlite or vermiculite into the mix.
4. Once green tips start to sprout — which may take up to a month, depending on the temperature — remove the bag and keep it in a warm room with plenty of natural light. An ideal temperature is right around 75 degrees F. You can expect to begin harvesting the rhizome in six to eight months.
Harvesting Guidelines
If you planted your ginger in the spring, it'll be ready for harvest in the fall. While you can certainly dig around the rhizome to check its size, the easiest way to assess whether it's ready for harvest is to look at the size of the plant stems. The root is ready for harvest when the stems have reached a height of at least 3 to 4 feet. The taller the plant, the larger the root.
You have two options when it comes to harvesting. You can either dig out the entire root, or simply snip off a piece for immediate use, leaving the rest. If you want mild-flavored "stem" ginger for a culinary twist, harvest only what you need each time as the root will become "hotter" as the outer skin begins to dry out.
Remember to save some pieces to repropagate your ginger plants. Either select a plump, firm piece and cut in to smaller pieces, as you did before, or simply replant smaller rhizome pieces still attached to the plant stems. This way, you'll be able to maintain a continuous supply of ginger year-round. In winter months, you could simply bring the pot indoors.
Storage Tips
Fresh ginger will keep for at least three weeks in the refrigerator. To maximize shelf-life, place a whole, unpeeled piece in a resalable plastic bag; squeeze the air out and place it in the crisper drawer. If the piece has been cut or peeled, blot the moisture off with a paper towel before storing.
If left out on the counter, it'll dry out within days. Once the ginger starts to wrinkle, it will have lost much of its flavor and medicinal potency. Grated ginger can also be frozen for about six months, saving you a bit of time and cleanup when cooking. To freeze ginger:
Peel and grate the ginger
Place scoops of ginger (in whatever measurement is most convenient for you, say teaspoon or tablespoon sized dollops) on a parchment-lined tray’
Place the tray in the freezer until the dollops are frozen solid, then transfer the dollops to an airtight container.
Facts Credit: mercola.com


